You will read in Great Detail about What is glitter Nails designs and with step by step tutorials also the TOP 10 Glitter ombre nails designs. Glitter Ombre Designs is one of the subtypes of Ombre designs. As all of the Ombre nails, art is gorgeous and look charming while wearing it on your nails but Glitter Ombre design is one of the more attractive and illuminating designs of it. So in this article, we will describe glitter ombre design in very deep detail and also we will write about the method in details tutorial that how to create Glitter Ombre art on your nails. Also, we will try to discuss its famous designs which are used more by its lovers.
Check Best Tools for your Nails care on AMAZON
How to create Glitter Ombre Nails Design-step by step tutorial
Before proceeding to the tutorial let me tell you that you what you will need to create Glitter Ombre Design on your nails. Following is the list of the item that you must have:
- A Nail file and the optional cuticle stick
- The Base and the top coat nail polish
- The Black nail polish (you can try a different color as well)
- The Glitter nail polish – (Your choice)gold or silver work best for this look
After collecting all the above items you can follow the following steps.
Step 1: File the tips and Buff the nail’s surface
Well, this step should be performed prior to every design. Always start by prepping your nails, it won’t only keep your nails in tip-top condition but also provide a better application of design. So Start by filing the tips of your nails of each finger to get rid of any irregularities then buff the surface for a smooth finish. An option is to use a cuticle stick to gently push back your cuticles which will shape the base of your nails and make them appear longer!
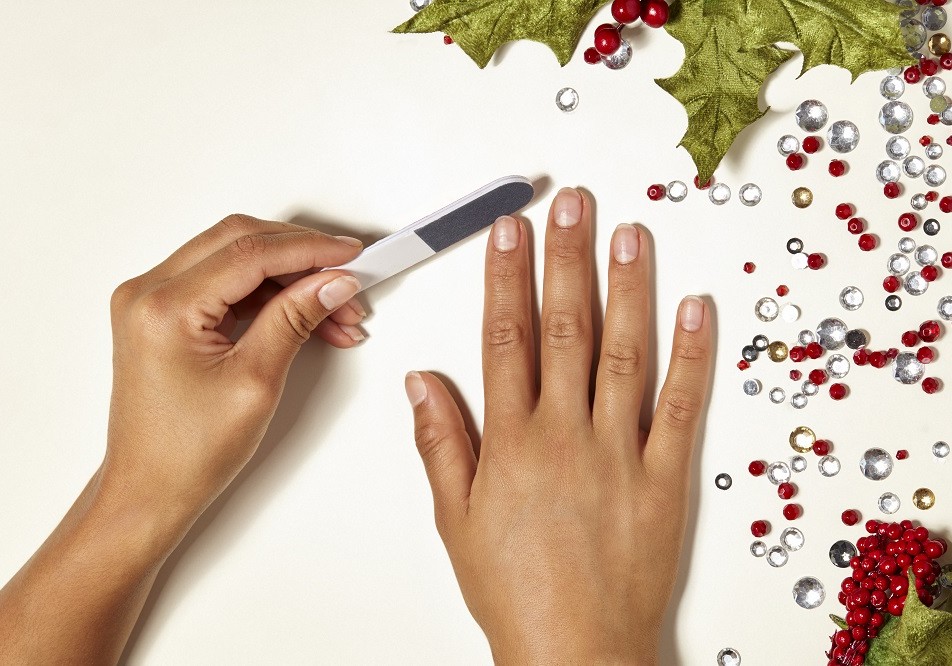
image: superdrug.com
Step 2: Apply the Base Coat on your nails
After successful filing and buffing now apply a base coat on all your nails, because this will give you two benefits. Firstly, as you’re going to apply a dark color nail polish there is the possibility that it could stain your nails which later can create a problem for you in your next design. So that’s why using a base coat will provide a clear protective layer helping to prevent this from happening, and the second benefit of it is that it helps the nail polish stick and create a smooth finish.
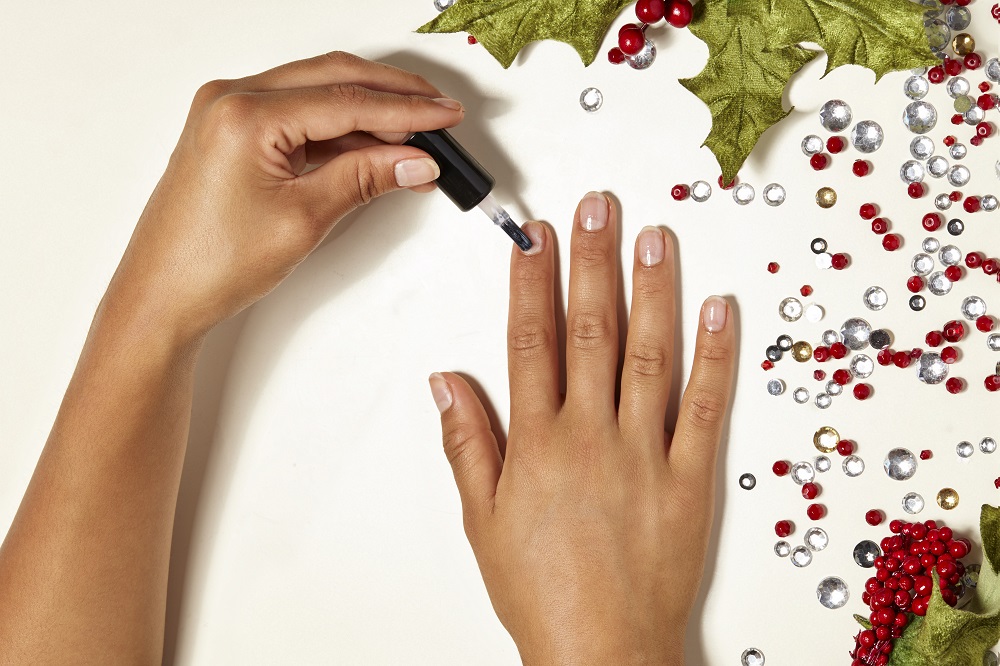
image: superdrug.com
Step 3: Paint it, Black
Now after the base coat apply black nail polish, and make sure to make it darker because the darker the better! so for complete coverage don’t be afraid to apply a second coat of black paint on it.
Check Best Tools for your Nails care on AMAZON
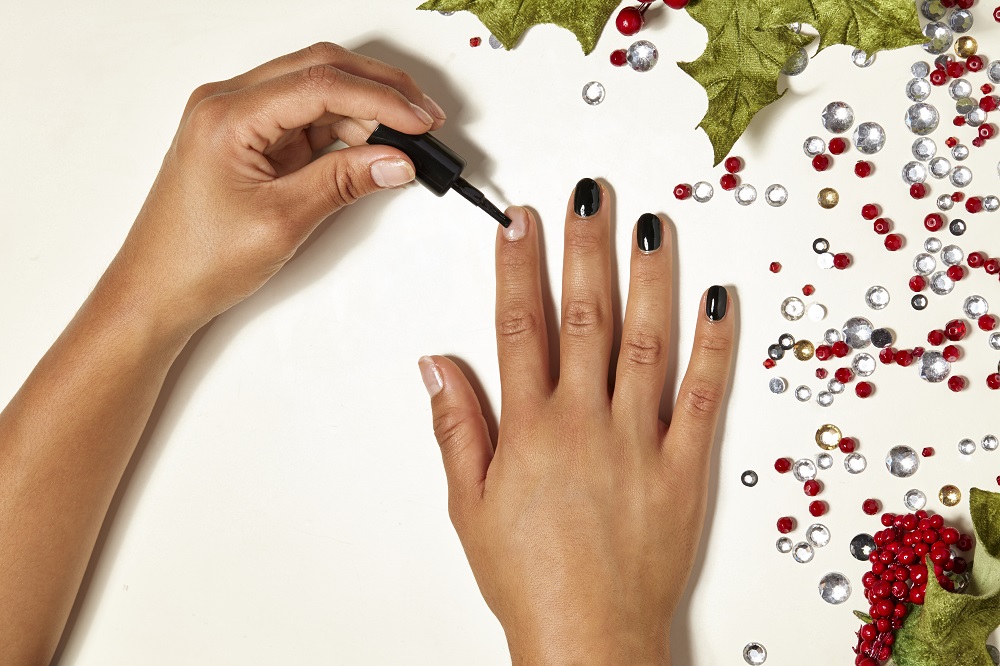
image: superdrug.com
Step 4: Pour Golden Glitters
Now after completely making it darker Now Cover each nail with gold glitter nail polish, and this is not necessary that you must use only gold but instead, you can also use silver for a different effect as per your choice.

image: superdrug.com
Step 5: Build the Layers
The ombre effect on nails is somehow is the same as with hair, the basic idea of ombre design is to create a gradient either from light to dark or dark to light. But for our glitter nails, we want the gradient to be less glitter near the cuticle and increase towards the tip. To achieve this effect once the glitter has dried apply a second coat only to the top half of the nail and you will hopefully achieve your desired art.
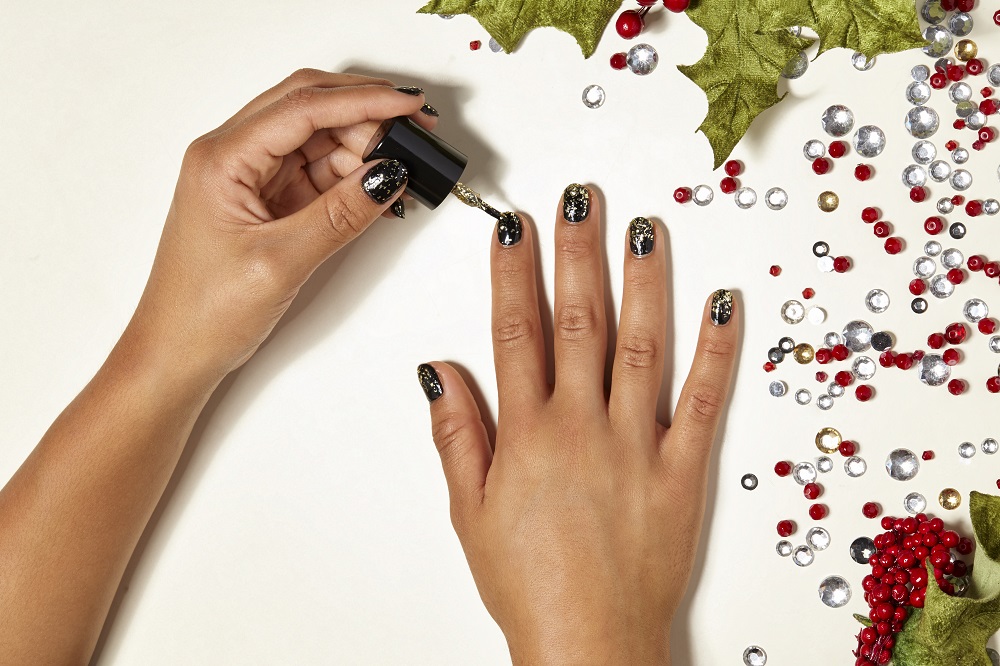
image: superdrug.com
Step 6: Glitter the Tip of the nails
Now to finish of the ombre effect, once the second layer has completely dried, after then apply a final coat of glitter just to the tip of your nails.
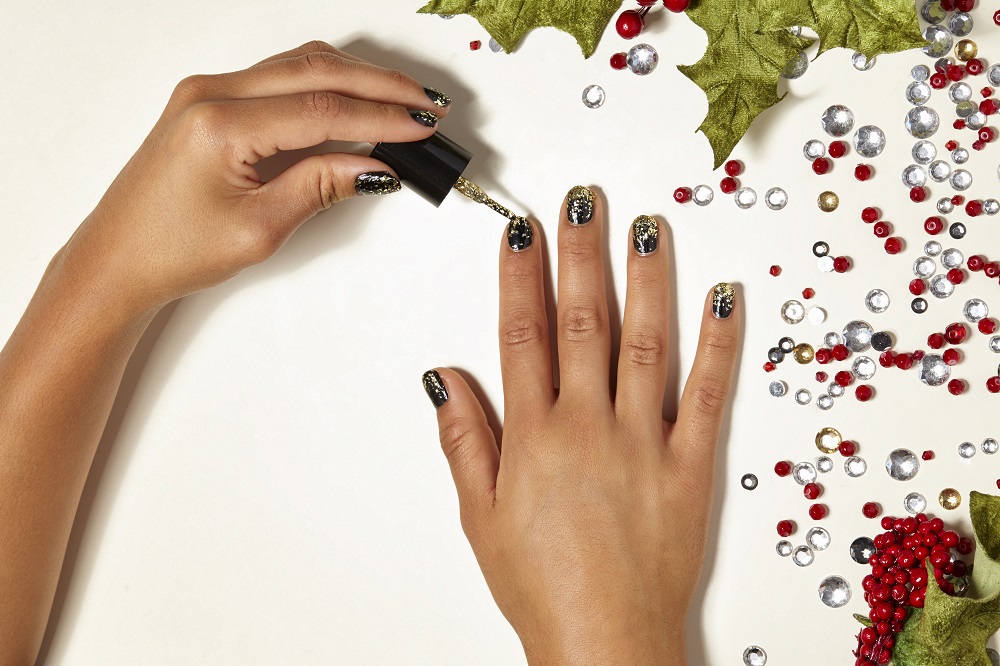
image: superdrug.com
Step 7: Final Top Coat
Last but not least, apply a top coat to your nail’s surface to help prevent unwanted chipping. There you have it, ombre glitter nails in seven quick steps.
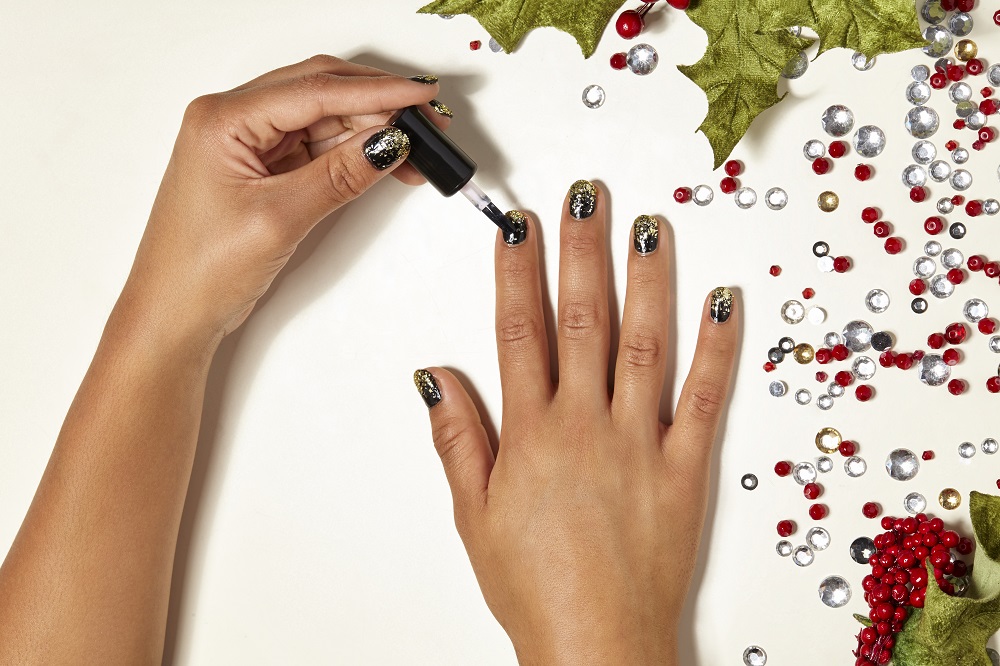
image: superdrug.com
So that’s it for this Now let’s move on to our next and our main topic that is TOP 10 G-Ombre Nails Designs. We will discuss one by one and also we will explain how to do it with step by step tutorial.
You May Also Like to Watch :
Top 10 Glitter Ombre Nails Designs with Step by Step Tutorials
Top 20 Eye Catching Ombre Nail Designs
Complete Ombre Nail Design with Tutorial
Glitter Nails Design With Step By Step Tutorial
Here are the TOP 10 GLITTER OMBRE ideas for nails. With this design, the nails Shine bright like a diamond with these ombre glitters. It’s really easy to put on your nails and give this look at home, and you can also customize it with your preferred base color and even can add your other favorite colors. This design will jazz up your nail game and take it to a whole new level of glamor. Here are some of the Top 10 Glitter Ombre Nails ideas.
- 0: Ombre Nails Acrylic Design
- 1: Royal Blue Jewel-Toned Glitter Nails
- 2: Half Moon Glitter Nails
- 3: Christmas Glitter Nails
- 4: Black Glitter Nails
- 5: Party Glitter Nails
- 6: Glitter French Manicure
- 7a: Holographic Glitter Nails
- 7b: Holographic rose gold nail design
- 8: Chunky Gold Glitter Nails
- 9: Cocoa Gold Glitter Nails
- 10: Ombre Glitter Nails
Glitter Ombre Design Video
0: Ombre Nails Acrylic Design
1: Royal Blue Jewel-Toned Glitter Nails
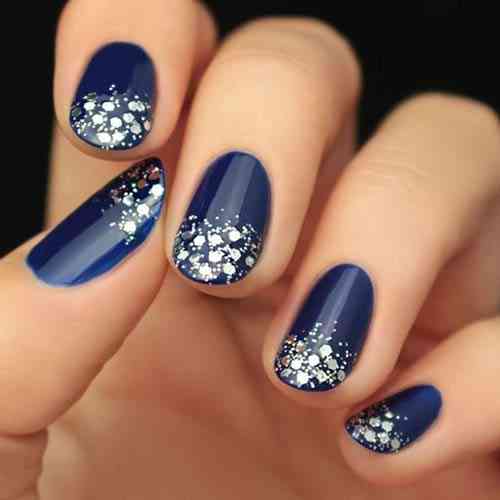
These sapphire blue nails are just love, believe me, the look of this design just attracted me and compelled me to keep it on the top of the list. These Royal blue nails are all you need for a classy event and gathering. Ans the good thing about this is that this design is really easy to do, and it has got just the right amount of glitter to dazzle up that blue. You can redesign this with different colors as well if you wish. Love it? Here’s how you can do this with step by step tutorial.
Royal Blue Jewel Toned Glitter design Step By Step Tutorial
Step 1: For better result apply two coats instead of one of sapphire nail polish and allow it to dry.
Step 2: Now apply a fine glitter polish to the edges of your nails and dab it lightly to spread the glitter around.
Step 3: Let it dry properly, now then apply a thin coat of chunky glitter polish over it carefully.
Step 4: And finally top it off with clear nail polish to secure the design for a little longer. You are all done-Enjoy!
2: Half Moon Glitter Nail Design
The Half moon glitter trend is so in right now! This modern twist to the traditional French manicure is very simple to do. All you need is a contrasting secondary color at the base of your nails, and it only takes about a few simple steps to accomplish.
Hals Moon Glitter design Step By Step Tutorial
Step 1: You will need to Push back your cuticles as the half-moon shape will rest near them.
Step 2: Now Apply two coats of your preferred nail color and allow it to dry perfectly.
Step 3: Use a rounded band-aid that’s not too sticky and place it over the bottom of your nail, so it forms a half moon shape at the base of your nail. It is easy to do once you try it.
Step 4: And now finally paint this area with a fine glitter nail polish, and once you’re done with it, carefully remove the band-aid to prevent design distortion.
3: Christmas Glitter Nails Designs
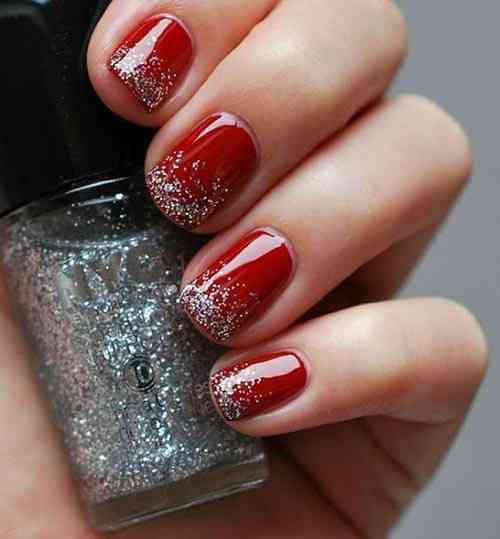
You know what this is also one of the most attractive and shiny looking designs which attract the eyes of the viewer toward itself. And to put on this nice design on Christmas make it more special because there is no better color or design than gorgeous red nails for Christmas, right? Add a bit of glitter, and you’re left with swoon-worthy holiday nails that look utterly festive and will make you stand out. Like it? Want to know how to achieve this look? So Let’s get started with step by step tutorial.
Christmas Glitter design Step By Step Tutorial
Step 1: Apply two coats of classic red nail polish and let it dry completely.
Step 2: Use a fine glitter nail polish either in gold or silver and apply it on the edges of your nails.
Step 3: Use a brush to gently dab the glitter on the bottom half of your nails.
Step 4: Apply a glossy top coat and let your nails dry.
4: Black Glitter Nails Design
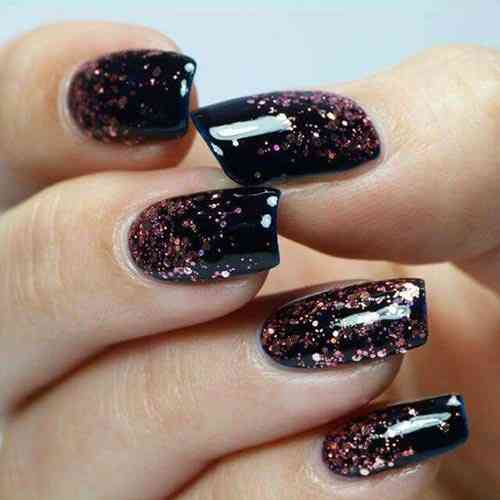
Now its time to talk about black beauty. So if you want to give it a try to black design. This black holiday nail design is way too pretty to pass up. It’s time to channel your inner nail junkie with this edgy design art.
Black Glitter nails design Step By Step Tutorial
Step 1: Apply to black coats on your nails with black nail polish.
Step 2: Now then use a chunky glitter nail polish with copper, gold or silver glitter (according to your desire) and then apply it to the base of your nails. Dab the glitter smoothly, so it spreads and creates an effect of shiny pieces.
Step 3: Apply the glitter polish on the entirety of your polished nails and let it dry properly.
Step 4: Once it dries, finish with a top coat over the surface of the nails!
5: Party glitter nails design
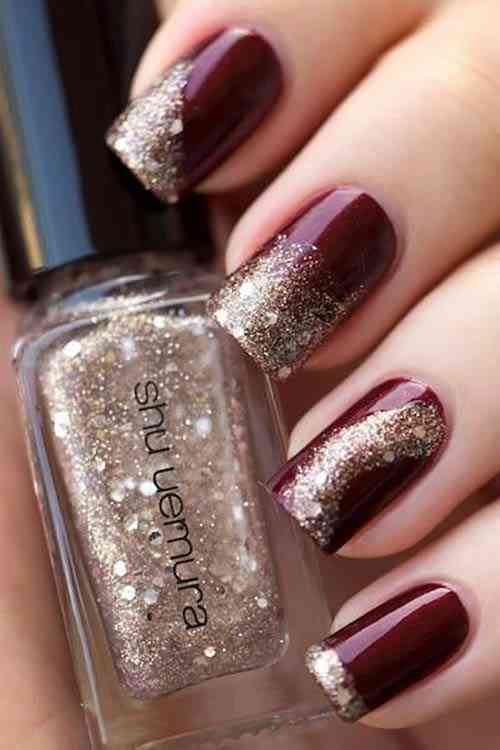
Image: modernfashionblog.com
Here in Party glitter design, this combination of wine and gold is a classic that you absolutely love to try out for the next party you are going to attend. It’s also one of the favorite combinations on, wintery days that are screaming for some color and sparkle. Do you like it? Here’s how you can accomplish this design with step by step tutorial.
Party Glitter Nails design Step By Step Tutorial
Step 1: Paint your nails with two coats of wine nail polish and allow it to dry properly.
Step 2: Now use a gold glitter nail polish to create patterns on your nails.
Step 3: Let your nails dry properly.
Step4: Once your nails have dried and finished your manicure with a top coat.
6: Glitter French Manicure Nail Design

Image: thecuddl.com
Here we are with something new for you If you’re bored of the traditional French manicure nail, you can pass it up by adding glitter to this classic look and make is more mesmerizing. Now It will look so soft and Disney princess-like! It can also look perfect with your white wedding gown and with other any type of white dress. Make sense? Want to give it a try? Let’s have a look at a step by step tutorial for Glitter French manicure
Glitter French manicure nail design -Step By Step Tutorial
Step 1: Paint all of your nails as a base coat properly.
Step 2: After that apply a fine glitter silver nail polish starting from halfway across your nails to the tips of it.
Step 3: Now dab the glitter polish gently, so the glitter looks more like a gradient.
Step 4: Finish with a top coat, then let it dry and yer you’re all set!
7: Holographic Nail design with Glitter polish
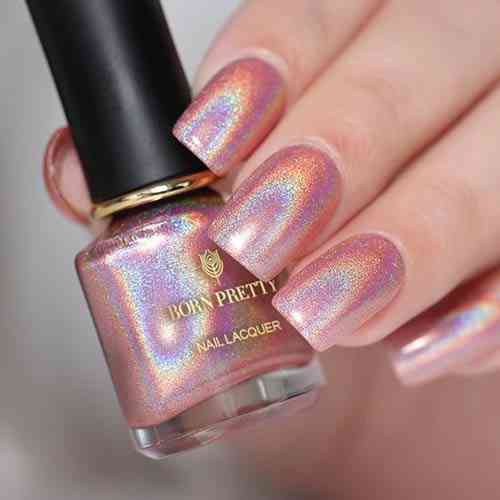
image: www.bornprettystore.com
Well, there are a lot more designs and nails arts but still, from fashion bloggers to runway models, everyone seems to be embracing the holographic glitter nails design trend. And you don’t have to break the bank to design this art, but you do need a UV lamp with some brands of nail polish to give a smart look. Of course you would love to give it a try and yet you may don’t know how to do it, if yes then here is a step by step tutorial for you to have this look.
Holographic Nails with Glitter- Step By Step Tutorial
Step 1: Paint your all nails to give a base coat.
Step 2: Again apply another two to three coats of Born Pretty holographic glitter nail polish in the shade of your choice to make it a solid color.
Step 3: Now give it a top coat and let it dry properly and you are done!. 🙂
7b: Holographic Nail with Rose Gold Glitter
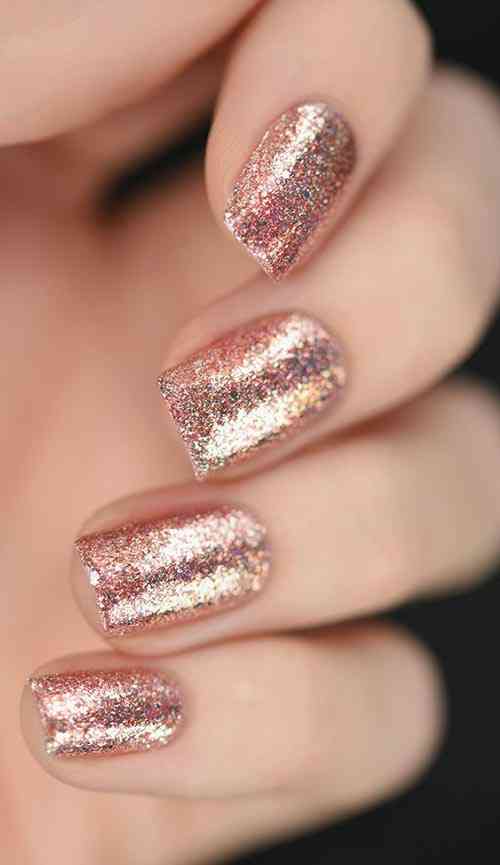
image: www.etsy.com
Now comes the holographic rose gold nail design and this would be one of the designs which will give a glamorous look to your hands and outfit. It’s super easy to design this art. How about trying it now? YES! Let’s go through step by step tutorial of this design.
Holographic Rose Gold design Step By Step Tutorial
Step 1: Apply nail polish as a base coat, so the glitter polish goes on evenly.
Step 2: Once your nails are completely dry, then apply two coats of your holographic rose gold nail polish.
Step 3: Apply a high-shine topcoat to finish the look. Let it dry and you are done and Groom now! 🙂
8: Chunky Gold Glitter Nails design
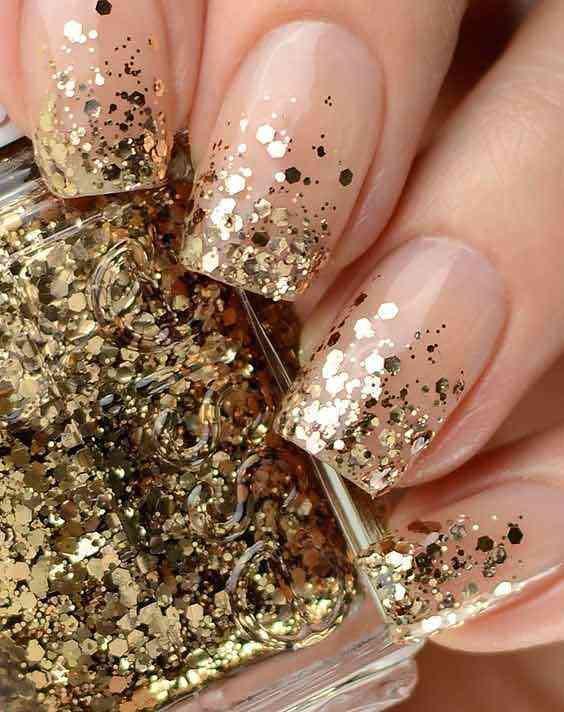
Image: www.totalbeauty.com
Chunky Gold glitter is pure dreamy art! Do you see how the nude base is complementing the gradient chunky gold glitter bits so flawlessly? If you’re into nude nail polish, you need to try this out because it’s classy, chic, and oh-so-fabulous – all at the same time. Right? Want to know how you can do this? Let’s have a look to is tutorial as well.
Chunky Gold Glitter Nails Step By Step Tutorial
Step 1: Apply two coats of nude nail polish like Essie’s ‘Skinny Dip.’
Step 2: Here comes the fun part of this design– adding glitter to your clean canvas! Use a bold and chunky glitter nail art polish above it. Try Essie’s ‘Summit of Style’ if you want a similar effect. Apply this to the bottom of your nails and dab at the glitter to create a gradient effect with it.
Step 3: Once you are done with your design work then let it dries,
Step 4: Finish your design with a top-coat so that your manicure lasts longer with no issue.
9: Cocoa Nail design with Gold Glitter Nails
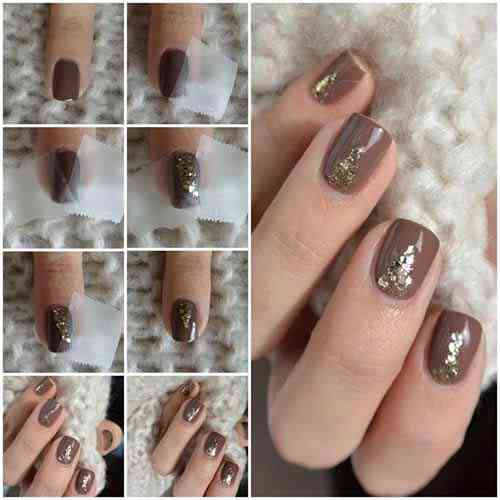
image: www.stylecraze.com
Well, this is also one of the fantastic art which can be achieved with brown nail polish is a wonderful choice for fall or winter. When combined with gold, it screams classy. Doesn’t it? Now let’s talk about its designing. You need some scotch tape to design this look with a few simple steps.
Cocoa Nail with Gold Glitter design Step By Step Tutorial
Step 1: Paint the nails as two coats of warm brown nail polish and allow it to dry.
Step 2: Place a piece of scotch tape(maybe you may use some other tape as well) diagonally across your nail on both sides to form a triangle.
Step 3: Now fill this space up with chunky gold glitter nail polish.
Step 4: Carefully remove the tape from your nails and keep eye on your design.
Step 5: To secure the design for longer, apply a layer of high-shine top coat on it. and let it dry and you are done with it.
10: Ombre Glitter Nails design
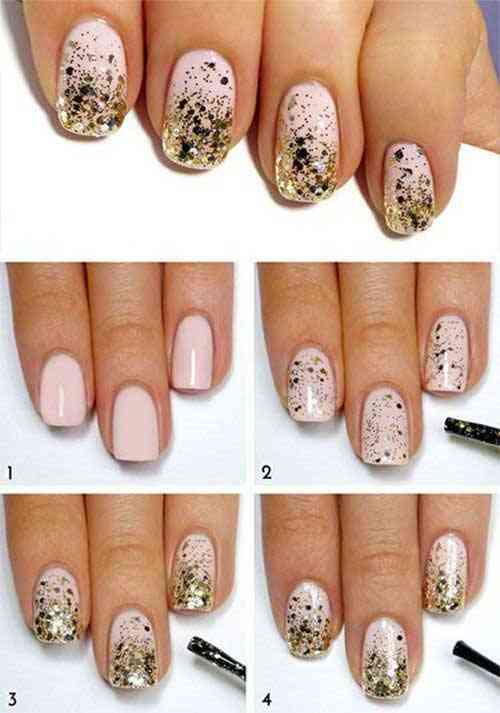
image: fabnailartdesigns.com
Let me now tell how you can Shine your nails bright like a diamond with these Ombre Glitter nails design. It’s easy to design this art on your nails at home, and you can also customize it with your preferred base color esily. This nail design will pass up your nails game and take it to a whole new level of glamor. Here’s how you can do this step by step.
Ombre Glitter Nails Design Step By Step tutorial
Step 1: Apply with two coats of your base nail polish and allow it to dry well. Here We’ve used OPI’s ‘Sweetheart’ for our base, you can use any other as well.
Step 2: Apply a thin coat of fine glitter polish on all your nails which is the main thing here.
Step 3: Let it dry well, apply the chunkier glitter nail polish only from the edge to the mid-point of your nail, it will create an ombre effect.
Step 4: Finish with a top coat. and again let it dry well till your final look.
Conclusion:
All the above are the best selected Glitter Ombre Nails Designs out there. You can tweak with colors in a different way to make it more appealing and attractive and shiny but still there are some other ideas in Glitter Ombre design which are mention below:
Glitter nails coffin, Reverse ombre nails, Pink g-ombre nails, Gold glitter ombre, Silver glitter ombre art nails, How to do glitter ombre nail with loose glitter, Blue glitter ombre 110mo, Glitter fade nails tutorial